Preparing Digital Images
for a Slide Show
Article Update February, 2015
Since writing this article several years ago, the software available for image editing has become amazingly more capable. In particular, Adobe Camera Raw has improved imeasurably: most—if not all—image processing can be accomplished using this software alone. Adobe Camera Raw is included with Photoshop and Photoshop Elements. Online video courses showing how to use the software, including courses tailored especially for photographers, are now readilly available free or for a small subscription price. I have taken several of these courses and they are on a par with those taught in college classroooms.
Software for sharing images by means of slide shows has also improved. However, the slide shows that are produced with the software are often not usable for smaller displays. Furthermore, not all programs produce slide shows compatible with all browsers.
Select Digitals is now undergoing a change to a more mobile-firendly site—and enabling the display of all content on mobile devices is a priority. Adobe Dreamweaver, the program I use for web development, makes creating HTML5 mobile-friendly sites easier than ever. The new face of Select Digitals is being designed around a fluid grid and uses CSS media queries to tailor the content presentation for various display sizes. For example, images will automatically resize for the smaller devices. As the site makeover progresses, slide and video shows will be replaced by articles and galleries that can be viewed across desktops, tablets, and phones.
Capturing the Moment
Taking those great images can be loads of fun, but the resultant images can be disappointing. We are lucky we live in the digital age: computer software can now save those seemingly throwaway images—and improve the keepers, too. Once the images have been taken and processed, they can be optimized for monitor display and integrated into a side show, gallery, or article.
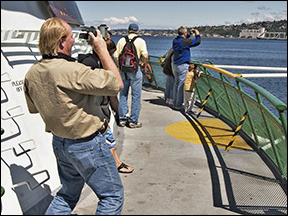
Image Problems
There are many problems that can affect the visual quality of a digital image. Problems that can show up in images include the following:
- posterization,
- loss of shadow detail,
- white, overexposed areas,
- dust spots,
- a crooked horizon,
- wide-angle lens distortion, and
- distracting flash reflections.
The images below illustrate these problems:


The good news is that these problems can be corrected in the digital darkroom.
Adobe Camera Raw
When I capture images, I like to minimize in-camera processing by shooting in the camera-Raw format (.CRW for Canon cameras). The Raw images can then be opened and processed with Adobe Photoshop Camera Raw. Other image formats—JPEG, TIFF, and Digital Negative (DNG)—can also be opened in Camera Raw for post-processing. In fact, from the Edit menu, you can set the Photoshop preferences to automatically open JPEG and Tiff files in Camera Raw. In addition, Camera Raw is now selectable under the Filter menu.


Perhaps the greatest advantage of using Adobe Camera Raw is that images can be processed and saved—while preserving the original image quality. For me, this is a huge advantage: as software and my processing skills improve, I can re-edit the originals again—starting from scratch–without loss of image quality. Processing that was previously applied to the Raw image can be removed through the Develop Settings under the Edit menu.

When image editing has been completed, the Done button will save the changes and exit Camera Raw, the Open Image button will open the image in Photoshop, and the Cancel button will abort image editing. There is also a Save Image button to save the image in a different format and location.
Adobe Camera Raw and Adobe Bridge are both included with Photoshop. Bridge and Camera Raw make organizing and editing digital images easier than ever before. After selecting one or more images in Bridge, the images can be opened directly into Camera Raw by simply typing Ctrl + r from the keyboard. Adobe Camera Raw can also be accessed from the more affordable Adobe Photoshop Elements.
The image below shows a screen capture of an image which has been opened in Adobe Camera Raw. The image in the preview area is of the famous Ye Olde Curiosity Shop in Seattle, Washington. This is the Raw, unadulterated, As Shot image.

It is apparent that parts of the image are highly overexposed. The sky, for example, is completely blown out. Adobe Camera Raw can be used to identify both overexposed and underexposed areas. The overexposed areas are confirmed by clicking the small triangle at the top of the histogram or typing the letter o (overexposed) on the keyboard. The overexposed areas are painted red to identify the areas of significant highlight clipping. There is no apparent shadow clipping in the image. If there were, and if the left-hand triangle in the histogram pallet were clicked or the letter u (underexposed) were typed, the underexposed areas would be painted blue.


Why do overexposure problems like this show up in images? If you are like me, sometimes you just want to point-and-shoot. However, taking just a little extra time before the shot can sometimes insure that an image will be a keeper. For instance, overexposure can usually be avoided by setting the camera to underexpose images by -1/3 to -1 stop: if this is done, detail in bright highlights are not likely to be lost. The camera's exposure compensation is adjusted to do this. Such a precaution is a good idea because once highlight detail exceeds the dynamic range of the camera, the detail is lost forever.
Graduated Filter
The Graduated Filter is a new tool in Adobe Camera Raw that simplifies the process of taming an overexposed image. The images below show how the filter works. I created a JPEG image in Photoshop consisting of a greyscale gradient. Notice that before the filter is applied, overexposed highlights are piled up on the right side of the histogram and this is indicated by the red area painted in the image. There is no loss in the shadow area. This is similar to the exposure problem in Ye Olde Curiosity Shop.


Mouse-clicking the graduated-filter icon or typing the letter G (not case sensitive) activates the filter. I moved the exposure slider to the left 4 stops (-4.00), clicked on the left side of the image and dragged the filter to the right. The image and histogram tell the story. The highlight clipping is gone and the exposure compensation was applied from a maximum at the left side of the image to a minimum on the right side—just what we want for Ye Olde Curiosity Shop..


The images below shows Ye Olde Curiosity Shop after activating the Graduated Filter. The shadows and highlights are spread more evenly across the histogram and there is little or no highlight clipping. While the Graduated Filter was still active, I also tweaked other adjustments which were applied in the same graduated way. After this processing, I turned to the problem of the lost sky detail.


Correcting Blown-Out Sky
To correct the blown-out sky, I first selected the sky. Since the sky was bounded by straight edges, I found that the Polygonal Lasso Tool made the selection easy. Next, I opened another image and, using the Rectangular Marquee Tool, I selected a replacement section of sky. I copied this selection (Ctrl + C) to the clipboard. Returning to the original image, with the blown-out sky still selected, I clicked the Paste Into command from the Edit menu and this copied the new sky into the selected area.


Correcting Posterization
In Ye Olde Curiosity Shop there are some false colors on the T-shirts. The solution I used to correct this posterization problem was to use Photoshop's Hue/Saturation adjustment. I used the Magic Wand to select areas to be corrected. I then reduced the saturation for the selected areas.


The final image below closely resembles the scene as it was when I captured the original image. Further processing, sometimes on a pixel-by-pixel basis, could improve the image even more. As it is, though, I can now use the image.


Correcting for Loss of Shadow Detail
In low light situations, especially when I do not use a tripod, I do the best I can with an externally mounted flash. Even so, distant image detail is sometimes shrouded in darkness. Fortunately, the shroud can often be easily lifted using the Graduated Filter and other adjustments. The image of the Touching Pools at the Seattle, Washing, Aquarium looks, at first, hopeless. With the image opened in Adobe Camera Raw, I applied the filter from top to bottom and then increased the exposure until there was no longer any detail lost in the shadows (underexposed, blue painted areas). At the same time, I used the Highlights slider to to reduce any highlight clipping.

I opened the image in Photoshop and used an adjustment that is a favorite of mine, Shadows/Highlights. As a final adjustment, I used an S-shaped curves adjustment to increase the contrast.


Correcting for Lens Distortion
Repairing the effects of lens distortion can result in greatly improved images. Previously, my favorite tool for this was Photoshop's Free Transform Tool. The transform procedures can be automatically activaded from the move-tool menu bar by checking the Show Transform Controls or by the control + T keyboard command.

Now, I use Lens Corrections in Adobe Camera Raw, wherever possible. The images below demonstrate how Lens Corrections is used. Correcting for lens distortion is much easier when the grid is displayed by typing V (not case sensitive) after the lens-corrections tool has been selected. If the Show Grid box is checked (at the bottom of the adjustments area), the grid will be shown automatically.

In the Profile tab, you can tell Adobe Camera Raw about your wide-angle lens by checking the Enable Lens Profile Correctons and completing the lens profile. After selecting Canon as the make of the lens, Adobe Camera Raw automatically filled in the lens model used and loaded the correct lens profile.
Manual adjustments using the sliders can still be done to refine the automatic corrections.

Corrections can take place automatically by selecting from among the following automatic options in the Manual tab:

- Auto: Apply balanced perspective corrections,
- Level: Apply only level corrections,
- Vertical: Apply level and vertical perspective corrections, and
- Full: Apply level, horizontal, and vertical perspective corrections.
For this image, I used the Full option.


The After Full Lens Corrections image shows that other work needed to be done. The red color in the lights show the need for an exposure adjustment and the image needed to be cropped. Also, becuause I used an external flash for the image, a White Balance correction was needed, too.

All of these corrections can be done in Camera Raw without opening Photoshop; or, after the lens and white-balance corrections, the remaining work can be done from within Photoshop.

Correcting for Flash Reflection
Many Photoshop tools and techniques can be used when correcting for flash reflections. For large corrections, similar areas without flash reflection can be copied and pasted into the image, just as was done when repairing the blown-out sky. Photoshop's Free Transform tool can then be used to size the pasted replacement to exactly fit over the area to be repaired. This was done for the blue wall areas above and below the artwork. To repair the top frame of the artwork, the bottom frame was copied, pasted, rotated 180 degrees, and moved over the top frame. I reduced the opacity of the new top frame a bit to reveal some of the texture below. In order to reduce the effects of flash reflection in smaller areas, such as the top of the center-panel artwork, I used various selection tools on areas to be adjusted and then reduced the brightness of the selected areas. Enlarging the image using the Zoom Tool before working on smaller areas makes the repair easier. The original image was taken at the Seattle, Wa, Aquarium. Note that I used Camera Raw Lens Corrections to correct wide-angle distortion before doing the other work.


Correcting for a Dust Spot and Crooked Horizon
Among the tools available in Adobe Camera Raw are some that I use frequently. As show below, these are the Spot Removal, Straighten Tool, and the Crop Tool. All of these were used while removing a dust spot and correcting a crooked horizon line in the image of a Seattle-Bremerton ferry.

Correcting a crooked horizon begins by clicking the Straighten Tool icon and then dragging a selection line along the horizon line to be corrected. When the mouse is released, the Crop Tool is automatically activated. Entering a keyboard Return, opening the image, or clicking the Done button applies the crop, which results in a straight horizon line.


Removing a dust spot in Adobe Camera Raw is easy—almost miraculous. After clicking the Spot Removal tool, simply drag over the spot to be removed. After releasing the mouse, another area is automatically sampled and applied to the dust spot. The green-sample ring can be moved and/or resized, if necessary, to change the sample area.


Luminance Masking
Previously, I showed how using the Graduated Filter can help correct an overexposed image. Another technique is especially useful for taming a high-contrast scene. Luminance Masking can help reduce the loss of both highlight and shadow detail. This technique works with images saved as Raw images (.CRW files for Canon cameras). Briefly, the technique is analogous to taking two images: one image is exposed for the highlights and another for the shadows. The images are then combined in the digital darkroom to take advantage of the best of both.
I purposely underexposed the image below, when taken, so that I would not overexpose the wonderful entry sign and interior lighting. I used a flash when I took the image. There are obviously lots of problems with the image. There is some severe lens distortion and the shadow detail is impaired.

I opened the image in Adobe Camera Raw and
- Set the White Balance to Flash,
- Corrected the lens distortion,
- Created two images, a lights and a shadows, and
- Used Photoshop to combine the images, create and apply the mask, and perform other adjustments.
The corrective procedure begins by opening the Raw image file in Adobe Camera Raw. I set the White Balance to Flash and used the Auto lens correction. Next, while watching for highlight cliping (overexposed areas painted red), I adjusted the exposure slider to -2.35. The resultant image was very dark but there was no clipping in the signs and lights. I opened this image in Photoshop and saved it as lights.psd. Leaving this image open in Photoshop, I loaded the Raw image again in Camera Raw. Now, I adjusted the exposure slider for the shadows—not worrying about the highlights. I adjusted the slider until there was no indicated loss of shadow detail (underexposed areas painted blue), to +2.70, and saved the image as shadows.psd from Photoshop.


At this point, the lights and shadows images were both open in their own Photoshop tabs. From the Photoshop Window menu, I tiled both images so that they were visible—at the same time— in the workspace. While holding down the Shift key, I dragged the shadows image onto the lights image. This created two layers: the shadows image was now layered on top of the lights (background) image. Holding down the Shift key while dragging the lights image onto the shadows resulted in perfectly registered images. The original shadows image was closed as it was no longer needed. The next step was to create and apply the luminance mask.


I did one other thing before creating the lumince mask: I selected and copied the fluorescent sign (above the doorway) and pasted this as a third layer over the shadows layer. I did this to preserve the intensity of the fluorescent sign after other processing was done. I turned off the shadows and sign layers.

After selecting the lights layer, I switched to the Channels tab and, while holding down the Ctrl key, I clicked the RGB layer. Martching ants appeared in the lights layer to show the selection. I then saved the selection: it is saved as an alpha channel.


Switching to the Layers tab, I turned on and selected the shadows layer. The marching ants (selected pixels) were easier to see in this layer.

I applied the selection as a layer mask to the shadows layer.

After double-cicking the layer-mask thumbnail in the shadows layer, I was able to adjust the Density slider to see all of the shadow and highlight detail captured in the original image.

Finally, I turned on the sign layer. I reduced the layer opacity, somewhat. The image below is the result of all of the processing to this point. Additional processing could be done by adding adjustment layers, as necessary.

A detail that is often degraded in images due to high-contrast scenes are windows, including reflections. In the image below, taken at the Flight Museum in Seattle, Washington, the window areas are highly overexposed. Using luminance masking, the detail through the windows can be recovered. I also used Photoshop's Shadows/Highlights and curves adjustments, as was done for the example of recovering lost shadow details. The Highlights slider was particularly effective in bringing out the detail behind the windows.


A New Gallery Design
In the past, I have used slide shows of various types to display my images. In the future, I plan to use a new and pretty basic gallery design to share my images. By using the new gallery design, I will be able to
- make my galleries more mobile friendly,
- display each image the way I want it to be seen,
- add easy to read image captions, descriptions, and notes,
- allow viewers to view gallery content at their own pace,
- hang the images on a non-distracting background,
- use basic HTML5, non-JavaSript-dependent code, and
- achieve a consistent display across multiple browsers.
I am now using a fluid grid design for my website and I use the same basic design for my galleries. This enables me to build and test HTML5 pages in Adobe Dreamweaver that can be viewed by display devices of all sizes. Fortunately, there are great online tutorials about responsive design using Adobe Dreamweaver (see the references at the end of this article). Essentially, I design all of my new web pages to fit the following display sizes:
- phones -- smaller than 480px,
- tablets -- 481px to 768px, and
- desktops -- 769px to a max of 1400px.
With Dreamweaver, I am able to tailor the layout for each of the different display ranges—and Dreamweaver takes care of the HTML5 and CSS code as changes are made from the Design view. Fine-tweaking of the code can be done manually from the Code view. Using Dreamweaver, I can alter the page design for a reasonable display for all devices. For all devices, text is easy to read and images are automatically sized to fit the display.
For the new gallery design, I size my images to a maximium of 1400 pixels in width—this is the maximum width, although the width can be smaller. The desktop display is designed to show the full-sized images (to a maximum of 1400 pixels) while smaller displays show scaled-down versions. The image height depends on what I want to show and can vary with each image. Thus, I am free from having to size all images exactly the same in order to fit a slide-show stage.
The new gallery design does not result in a Gee Whiz gallery or slide show with lots of bells and whistles. It could, though, with fancy frames around each image and more attention to stylish fonts, etc. However, I prefer to offer my images so that they stand on their own and can be viewed without a lot of external distractions.
References
- http://www.lynda.com/ -- At last count, 1,590 online, up-to-date courses.
- https://www.adobe.com/creativecloud.html -- Adobe Creative Cloud: an affordable way to get the latest Adobe products.
- A Day in seattle -- Look at a mobile-friendly, HTML5, gallery at Select Digitals. The gallery images were prepared as described in this article.
There are many references to "Liminance Masking" on the Web and a web search will find them. The subject can get technical and, for this article, I left out as much of the complexity as I could.