I first visited Hunter Farms this year in June. It is now October, and it seems like only yesterday since the corn was beginning to show promise, the beans were starting to climb up the netting, and the pumpkin plants were just showing above the plastic mulch in the pumpkin patch. The June day I visited was sunny and warm and the farm hands were harvesting the hay before the next rain. The trees along the Skokomish River were green. A Reindeer was shedding it's winter coat, and in the distance, the Olympic Mountains were showing the last vestiges of snow.
My next visit to Hunter Farms was at the end of September. Each year, in October, Hunter Farms hosts an event called "Pumpkin Patch." This year, I wanted to document the event, including the event preparations. In addition, I wanted to document the changes around the farm since my June visit. So, I dropped by the store to talk with Bill Hunter and Bill Hunter Jr. (JR) about when the preparations would begin. I could see that the store inventory already contained items appropriate to the Halloween season. Bill and JR told me that a crew would be starting the maze and slide construction the next day.
Before leaving for the day, I took a walk around the farm to see the changes since June and also to observe the harvesting of squash, corn, and giant pumpkins. Along with the corn, the farm workers also cut corn stalks for visitors who want them for seasonal decorating.
The next day, I arrived at the farm to watch as a semi-trailer truck of straw was unloaded and moved into the barn. The straw bales were used to build a spooky maze and fun slide for the "Pumpkin Patch" event, an annual family event for the Halloween season. Bill Hunter Jr. (JR) and crew completed the heavy work of building the maze and slide in two days and in time for the official opening of the event on Saturday, October 3.
My next visit to Hunter Farms was on October 10. Since my last visit a few days before, the fall colors were much more apparent. On the way to the farm, I stopped along the Skokomish river to check on how the fishermen were doing: it is Coho salmon season this time of year.
When I arrived at the farm, the Pumpkin Patch event was in full swing. I was amazed at all of the work that had been done since my last visit. Finishing touches had been applied to the barn. Vendors for both food and gifts had set up their tents. Every corner of the area, including the greenhouses, had been decorated for the event. The Pumpkin Event reminded me very much of a county fair.
I decided to take a closer look around the barn and greenhouses. Everywhere, I observed visitors enjoying themselves as much as I was. There was much to see around the barn and greenhouses.
All of the images in the flash shows were taken with an inexpensive HP R707, 5.1MP, 24x zoom camera. All images were hand held. For the highest quality JPEG, the image size is 2592 x 1952 pixels with a file size around 2MB. The lens is a 3x optical zoom with a focal length range of 8mm to 24mm—which is approximately equivalent to a 39-117mm lens on a full frame 35mm camera.
All of the images were processed in Photoshop. For the flash shows, the images were cropped to 500 X 375 pixels; for my web pages, I normally crop to a 400-pixel width for a full-sized image. After the images have been processed, I border them with a 1-pixel, black, inside stroke. Finally, I use Photoshop's "Save for Web..." utility, which saves the images with a JPEG quality of 80 (Very High) and at a 72-pixel-per-inch resolution.
The processing I use is "quick and dirty" as follows:
First, I crop the image to the desired size.
Second, I adjust for lens distortion and crooked lines. I use Photoshop's Free Transform for this (Edit/Free Transform, Ctrl + T).
Third, I adjust the shadows and highlights. A quick way to do this is to use Photoshop's Shadow/Highlight tool from the Image/Adjustments menu. Sometimes, however, I make this adjustment by using levels (Image/Adjustments/Levels...), mostly with the mid-tones slider.
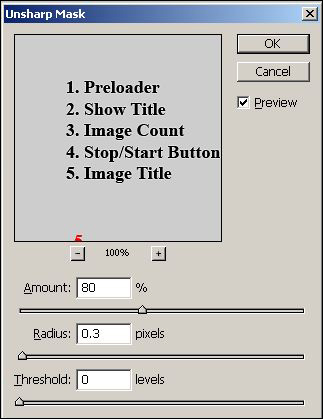
Fourth, I use a mild sharpening (Filter/Sharpen/Unsharp Mask...). For additional sharpening, you can sharpen again, increase the amount, or increase the radius. The best solution for badly out of focus images is not to use them.
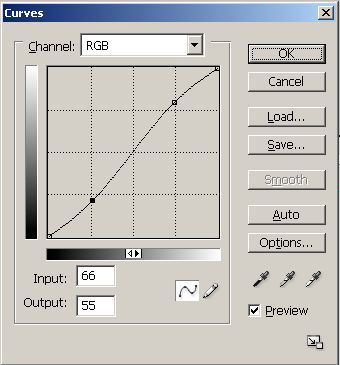
Fifth, I use curves (Image/Adjustments/Curves...). I adjust the highlights upwards and the shadows downwards so that the curves line becomes an S-shaped curve. This tends to make the images "pop."
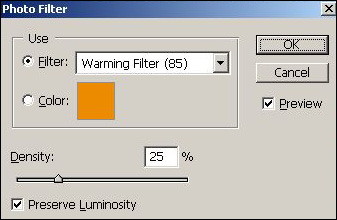
Some images require extra processing. For example, images I took of a fisherman along the Skokomish River were mostly in the shade. For these images, I used a bit of warming (Image/Adjustments/Photo Filter...).
I used Macromedia (now Adobe) Flash Professional 8 for the flash show. I designed a simple stage for the show and, after a lot of experimentation, arrived at a simple and reliable platform for my slide shows. The images below show the basic design. The first image shows the stage while an image is loading. I use a very visible indicator to show that an image is loading. The second image shows the stage after loading the 500 X 375 pixel image. I center the flash show in an HTML document by using <div align="center"><div> tags around the flash object code. I use a gray background for the HTML body so that the show is surrounded by a gray, non-distracting background.
"Flying Over Hunter Farms" This article has many images from the author's first October visit to Hunter Farms as a member of the Sanderson Field RC Flyers (SFRCF).
For additional information about Hunter Farms, you can visit the farm's website at http://www.hunter-farms.com.