I have completed the upgrade of WordPress at Select Digitals to WordPress 3.0-and I did this successfully using the WordPress automatic upgrade. One mouse click and the upgrade was done.
Duplicating my existing theme, which was based on the old default “Kubrick” theme, took a bit of work. The customized theme is based on the WordPress 3.0 default theme, “Twenty Ten” (2010). I called the customized theme, “SelectDigitals.”
I “built” the customized theme as a “child theme” to Twenty Ten. I followed the guidlines from the WordPress codex (see references at the end of this article). I created a SelectDigitals folder in the theme directory (wordpresswp-contentthemesselectdigitals) and copied the following files from the Twenty Ten directory:
- header.php
- footer.php
- single.php
- sidebar.php
- loop.php
- style.css
Note: line numbers might differ from these but should be close.
At line 63, remove the link from the blog name:
<a href="<?php echo home_url( '/' ); ?>" title="<?php echo esc_attr( get_bloginfo( 'name', 'display' ) ); ?>" rel="home"><?php bloginfo( 'name' ); ?></a>
Since I will not be using an image on the page, I deleted line 77:
<img src="<?php header_image(); ?>" width="<?php echo HEADER_IMAGE_WIDTH; ?>" height="<?php echo HEADER_IMAGE_HEIGHT; ?>" alt="" />
After the branding division (line 79), I added a thick, red horizontal line (line 69): the line is styled in the style.css file.
</div><!-- #branding -->

<hr class="header">
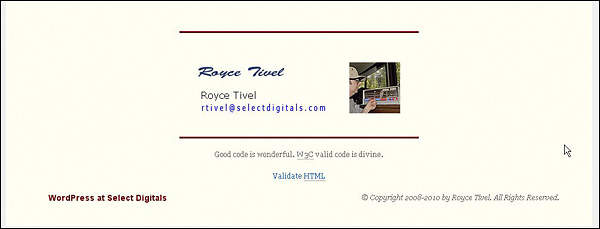
Figure 1 shows the final customized Twenty Ten (2010) header.

I essentially rewrote footer.php. Here is the code I used:
</div><!-- #main -->
<div id="footer">
<br />
<hr />
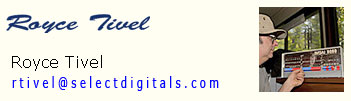
<img src="../../../../images/blog-sig.jpg" style="display: block; margin-left: auto; margin-right: auto; padding-top:2em; padding-bottom:2em;" alt="Contact Royce" />
<hr />
<p>Good code is wonderful. <abbr title="World Wide Web Consortium">W3C</abbr> valid code is divine.</p>
<a href="http://validator.w3.org/check/referer" title="This page validates as HTML5" target="_blank">Validate <abbr title="HyperText Markup Language">HTML</abbr></a>
<br />
<br />
<div id="site-info">
<a href="http://www.blog.selectdigitals.com"><?php bloginfo( 'name' ); ?></a>
</div>
<div id="site-generator">
© Copyright 2008-2010 by Royce Tivel. All Rights Reserved.
</div>
</div>
<!-- <?php echo get_num_queries(); ?> queries. <?php timer_stop(1); ?> seconds. -->
<br />
<br />
</div><!-- #footer -->
<!-- #wrapper -->
<?php wp_footer(); ?>
I changed each occurrence of → (→) with » (») and each occurrence of ← (←) with « («).
I removed lines 51-54:
<div class="entry-utility">

<?php twentyten_posted_in(); ?>

<?php edit_post_link( __( 'Edit', 'twentyten' ), '<span>', '</span>' ); ?>

</div><!-- .entry-utility -->
This gets rid of the nag, “This entry was posted in Announcements. Bookmark the permalink.”
The sidebar is essentially an unnumbered list. Here is the coding for one of the list items, “Tips”:
<li ><h2><br />Tips<br /><br /></h2>

<ul>

<?php

global $post;

$myposts = get_posts('numberposts=9&offset=0&category=6');

foreach($myposts as $post) :

setup_postdata($post);

?>

<li><a href="<?php echo get_permalink() ?>"><?php the_title(); ?></a></li>

<?php endforeach; ?>

</ul>

</li>
In order to use this structure, you must know the ID for the categories you want to use. See the reference section for a tutorial on how to determine this. The code parameters include the category ID, the maximum number of posts to display, and a post offset.
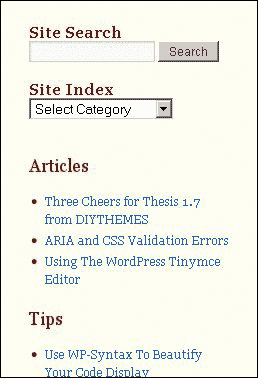
I have used the Search and Categories widgets in the sidebar. I use the Categories widget as a site index (Figure 3). Content I think most useful appears in the sidebar. Other content is given the archive category and can be found by selecting the “Archives” item from the “Site Index” drop-down widget.
The “Resources” section at the bottom of the sidebar is just a manually created list.
Perhaps the most important change in the loop.php file is at line 138: this is where the code is changed to force the use of excerpts in posts.
<div class="entry-content">

<?php the_content( __( 'Continue reading <span>→</span>', 'twentyten' ) ); ?>

<?php the_excerpt( __( 'Continue reading <span>»</span>', 'twentyten' ) ); ?> <!--This forces the use of excerpts.-->
I deleted lines 143-161 from <div class=”entry-utility”> to <!- .entry-utility ->.
Finally, I change the navigation symbols: &larrquo; and &rarrquo;.
Although it is not recommended, I made a couple of changes in the functions.php file in the twentyten directory. The first change was at line 240. I added a carriage return before “Continue reading” so that this would tuck neatly below each excerpt:
/*Change function to add a carriage return before Continue reading.*/

function twentyten_continue_reading_link() {

return ' <a href="'. get_permalink() . '">' . __( '<br />Continue reading <span>→</span>', 'twentyten' ) . '</a>';

}
Since I am the only author on this blog, I do not need to see author credit on the posts. Also, since I edit my posts from time to time, I changed the wording below each post title to “First Posted on + Date” (First Posted on July 22, 2010).
Original Code:
function twentyten_posted_on() {

printf( __( '<span>Posted on</span> %2$s <span>by</span> %3$s', 'twentyten' ),

'meta-prep meta-prep-author',

sprintf( '<a href="%1$s" title="%2$s" rel="bookmark"><span>%3$s</span></a>',
Changed Code:
function twentyten_posted_on() {

printf( __( '<span>First Posted on</span> %2$s ', 'twentyten' ),

'meta-prep meta-prep-author',

sprintf( '<span>%3$s</span>', /*Remove the date link*/
For now, I will have to remember to make these changes after each version upgrade.
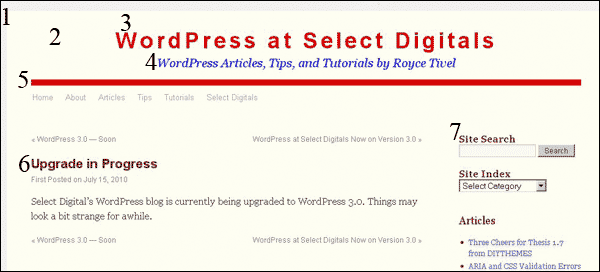
Finding where in the code to make styling changes is, for me, sometimes a trial and error procedure. Figure 4 shows some of the elements I have styled.
- /*Make the body background #f1f1f1*/
body {
background: #f1f1f1;
} - /*Make the page background color #fffef2 (header, footer, wrapper)*/
#header {
background: #fffef2;
}
#footer {
background: #fffef2;
text-align: center;
}
#wrapper {
background: #fffef2;
} - /*Make the site title big and red*/
#site-title {
width: 940px;
font-size: 36px;
letter-spacing: 5px;
color:red;
font-weight: bold;
text-decoration: none;
} - /*Style the site description*/
#site-description {
text-decoration: none;
color: blue; /*Make the blog tagline blue*/
width: 940px;
text-align: center;
font-size: 20px;
margin-top: 10px;
} - /*Style the header horizontal line*/
hr.header {
width: 900px;
height: 10px;
background-color: red;
display:block;
margin-left: auto;
margin-right: auto;
margin-bottom: 0px;
} - /*Style the entry title for the home page*/
.entry-title, #content .entry-title {
color: maroon;
}
.entry-title, .entry-title a:link, .entry-title a:visited, #site-info a {
color:maroon;
}
.entry-title a:active, .entry-title a:hover, #site-info a:active, #site-info a:hover {
color: #114477;
text-decoration: underline;
} - /*Style the sidebar widget area*/
.widget-title {
color: maroon;
font-size: 16px;
margin-top: 0px;
font-family:Georgia,”Bitstream Charter”,serif;
}
.widget_search label {
color: maroon;
}
.widget-area a:active, .widget-area a:hover {
text-decoration: underline;
color: #114477;
}
.widget-area ul ul {
list-style: disc;
color: maroon;
margin-left: 1.3em;
}
Finding the right CSS class or ID attribute to change for styling a particular page element can sometimes take a bit of searching. Browser enhancements, such as Firefox’s Firebug and Opera’s Dragonfly, make this much easier. Firefox also has a fantastic toolbar, Web Developer, that is of great assistance in theme development. See the references section for links to more information.
I use my own CSS for image display. Therefore, I have deleted the image section from the twentyten style.css file (lines 759-845). Here is the code I used for the Figure 1 centered image and caption:
<div class="centercaption"><strong>Figure 1:</strong> Final Customized Twenty Ten (2010) Header</div>

<img class="displayed" src="http://blog.selectdigitals.com/images/wp3x/1.gif" alt="Final Customized Twenty Ten (2010) Header" />
The CSS code for this is
/* This code centers a caption in the page */

.centercaption {

padding-top:1em;

color: #000000;

text-align:center;

font-size:1em;

margin-bottom:.5em

}
/* This code centers an image in the page */
img.displayed {
display: block;
margin-left: auto;
margin-right: auto;
margin-top: 1em;
margin-bottom:2em;
}
For more information about image styling, see the article, “Presenting Quality Posts With Style” in the references section.
- WordPress Child Themes - The best way to customize a theme.
- The WordPress Loop - Learn how WordPress pages are assembled and displayed.
- “How to Find a WordPress Category ID”
- “Create Quality Articles With CSS” — A good tutorial on using HTML and CSS.
- “Presenting Quality Posts With Style” — Lots of information about styling images, captions, and section headers.
- w3schools — The best single source for information about CSS and (X)HTML.
- Firefox Web Developer add-on
- Firefox Firebug add-on
- Check Select Digitals and Elizabeth Adams Direct for more information on styling and theming.