In a previous post, I discussed how I upgraded my blog to the latest WordPress version-with very low stress. One of the main reason for this was the preparation and testing I did on my local PC test bed. In this post, I will describe how I installed both a test bed and WordPress on my local PC.
On my local PC, I had previously installed Apache, mySQL, and PHP. My original installation was through open source and individual packages: I installed each of these components individually. However, there is a better and quicker way for those wishing to install their own WordPress test bed—WampServer.
The present components of this integrated, easy to install package are these:
- Apache 2.2.11
- Apache MySQL 5.1.30
- PHP 5.2.8
I decided to give the latest version, WampServer 2, a try-out on my local PC and to test the ease of installing WordPress after WampServer was operational. I’ll give you a clue right now of how I like WampServer after my testing—it’s wonderful.
I am not going to bother with lots of detail about the installation because the installer is just plain bulletproof: except for electing to create Desktop and Quick-Launch icons, I accepted all of the defaults for an easy install.
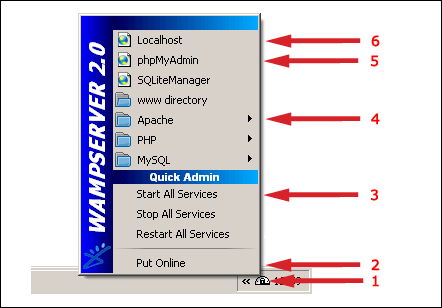
When the installation was completed, the installer placed a new icon in the system tray (Figure 1, #1). If the icon is not present after system startup, clicking either the quick-start or desktop icon will place it there. Left clicking the icon resulted in the figure-1 menu.
The very first menu item is a toggle for placing the server online or offline (Figure 1, #2). I keep this set to the offline (default) mode because I only want to access WampServer from my local PC.
At this point, a click on the “Localhost” menu item (Figure 1, #6) will bring up the very first WampServer HTML page. You can also type in the following URLs in your browser to access the web server: http://localhost or http://127.0.0.1.
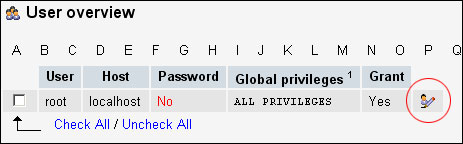
My next step was to set a password for the mySQL server. Unless this is done, the server is a security risk. Clicking the phpMyAdmin menu item (Figure 1, #5) brought up phpMyAdmin. Initially, there were two information messages at the bottom of the page. One message warned that the password had not been set. The other message about the PHP mySQL library version can be safely ignored.

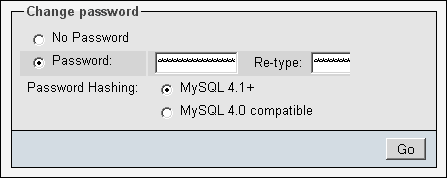
From the phpMyAdmin screen, I selected the Privileges tab (Figure 2), clicked the “Edit Privileges” icon for “root” (Figure 3), entered a password (Figure 4), and clicked the “Go” button. This assigned the password to the root user. One more step needed to be completed to eliminate a nasty-looking error message.
I opened the phpMyAdmin configuration file at C:wamp/apps/phpmyadmin3.1.1/config.inc.php (for my installation). I used my favorite text editor to add the root password to the file (figure 5).

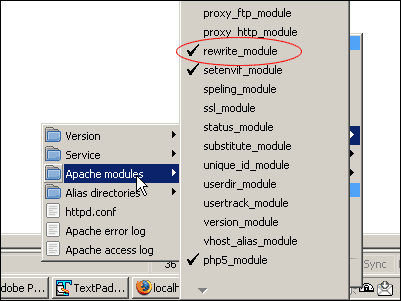
In preparation for WordPress, I activated one additional Apache module. From the quick-start menu (Figure 1, #4), I selected
Apache/Apache modules/ and checked the rewrite_module. You may have to “Start All Services” for this to take effect (Figure 1, #3). When the module has been activated, a check mark will be in front of the option (Figure 6). The rewrite_module is needed for “pretty URLs,” or permalinks. For my WordPress sites, I use a custom permalink of /%postname%/.
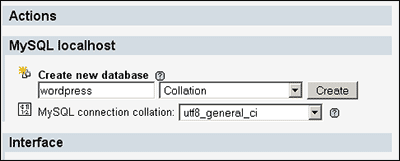
WordPress needs a mySQL database to store blog data. I opened phpMyAdmin , entered a database name of “wordpress,” and clicked the “Create” button (Figure 7). That’s it! WordPress will fill in the tables it needs.
Next, I downloaded the latest version of WordPress and unzipped the file into the C:wamp/www directory. All web pages get placed in this root directory. In fact, the default home page for WampServer is reached through the index.php file that is already there.
Before running the WordPress installer, the wp-config.php file needed to be created and modified in order to tell WordPress how to access the database. Instructions for doing this can be found in the reference section at the end of this post.
Once the wp-config.php file had been modified, the installation could begin. I just typed in http://localhost/wordpress/ into my browser, hit the “Enter” key, and the installation began.
The installation began by asking for a “Blog Title” and “Your E-mail.” Just below these two entry boxes, there is a check box which, when checked, allows search engines access to the blog. For my test bed, I leave this unchecked.
After the installation, WordPress was accessible at http://localhost/wordpress. Since I wanted to access WordPress from the root directory by just typing in http://localhost (or just plain “localhost” on my system), I followed the Codex instructions for giving WordPress its own directory (see references below).
To help keep my test bed private, I installed a plugin called Maintenance Mode. The plugin enables me to display a web page to anyone browsing to the WordPress test site. I configured the page to display the message, “This Site is Permanently Offline.” The page does allow the administrator to log in, manage, and view the blog.
- How to Install and Style WordPress — A comprehensive tutorial on installing and styling WordPress.
- Giving WordPress its Own Directory
- WordPress Comes to Select Digitals — A detailed record of the WordPress installation and theming for this blog.